Setting up gCBASIC on Linux
This guide take you to all the steps for building your first Great Cow BASIC Project under Linux with native Great Cow BASIC Compiler. The reason for this is simply Velocity. Using the Windows IDE with wine takes 5 times longer to compile the Basic Source Code. This guide will use Linux Mint 19.2 Cinnamon Edition. The steps for other Linux Distribution may be a little bit different. In case of trouble ask the forum.
It is up to you which one you use 32 Bit or 64Bit. When this is important we will emphase this. Standard is 64 Bit and this is assumed for this Guide.
Great Cow BASIC has been written with the Freebasic Compiler. Freebasic is a Compiler which is very versatile, available for all platforms and it is Open Source and free, just like Great Cow BASIC does.
Freebasic has not find it's way into the Repository of most Linux Distributions. But this is no problem at all, we can get, compile and install it just in a few Minutes right away. So let's start! Text in green are Hints, You can safely ignore or read it
chapter 1: installing Great Cow Basic
At first we get the Source. So start your Firefox and enter this:
Download it to the Folder Downloads. (It is important to use the 64 Version, supposed you do have the 64 Bit Version of Linux Mint.)
Once the Package is downloaded it has to be unpacked.
A simple way to do that is, just start the Filemanager. (It is the Folder Icon on the Desktop)
Now Double Click the downloaded Package and press Extract.
This will extract all the content in the Folder Downloads, which is ok, as we can delete it later.
In order to install the freebasic Compiler, we now must leave the Graphical Interface and get our Hands on the Terminal.
Small insert to explain why the Author prefer the command console instead of the graphical software installer:
First, the description for the needed Steps is much simpler, because on the console you can simply specify all packages in one go. if I would to show and do this using a graphical installer, each package would have to be searched and installed separately.
This is much more difficult for the Author and for the user to understand.
The second reason is that the software installer installed in Linux Mint does not find the required packages at all. This is only a shortcoming of this installer, but it complicates the matter. So dear reader: eyes on and through :-)
 Starting a Terminal Session:
There are more than one ways to do it.

The simplest is just clicking on the Icon with the white $_ on black.
Now, the terminal is started and ready for Input.
You can maximize the Terminal Window if you want.
Why we need Freebasic:
Great Cow Basic for Linux is distributed as source code written in Freebasic, so in order to compile Great Cow BASIC we must have the Freebasic Compiler
Normally the Freebasic compiler must be compiled with the standard C-Compiler which is on Linux Mint already on Board.
We did downloaded an already compiled Freebasic Compiler. But some small Packages are missing. We will now install them as root. In Linux Mint we use sudo for this, so we gain root access only for one command.
Enter the following in your Terminal: (copy paste it, so you don't make typing errors)
sudo apt install libncurses5-dev libffi-dev libgl1-mesa-dev libx11-dev libxext-dev libxrender-dev libxrandr-dev libxpm-dev
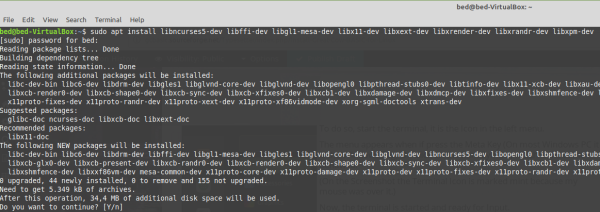
You will be prompted for your Password and the needed Packages are been listed, Please answer the Question "Do you want to continue" with <Return>.
The installation begins.
Now there are plenty of messages, as long as there is no ERROR displayed it is all going well and depending on your Internet speed, a few Seconds later you gain the Prompt again.
Now the system is ready for installing Freebasic.
Enter this in the Terminal: ("ll" is an shortcut for "ls -l" it does a detailed Listing like dir in Windows)
and press <Return> (copy paste it, so you don't make typing errors)
cd Downloads/FreeBASIC-1.06.0-linux-x86/
ll

This should be the result in the Terminal Window so far.
The green install.sh with the trailing star is a little shell script which is executable.
That's why the color is green and has a Star at its End.
Now enter this in the Terminal:
sudo ./install.sh -i
Test it with the following command:
Enter fbc --version in the Terminal, it shall look like this:
fbc --version

bed@bed-VirtualBox:~/Downloads/FreeBASIC-1.06.0-linux-x86_64$ fbc --version
FreeBASIC Compiler - Version 1.06.0 (02-17-2019), built for linux-x86_64 (64bit)
Copyright (C) 2004-2019 The FreeBASIC development team.
It looks for you like here? Congratulations, You do have now a Linux Distribution which can compile Freebasic Source Code to executeble Binaries.
Now we are ready to install Great Cow BASIC.
Now download the GreatCowBASIC for Linux.
Use this URL: https://sourceforge.net/projects/gcbasic/files/GCBasic%20-%20Linux%20Distribution/
and click on the Green Button "Download latest Version". (now at the date of writing this Article it is GreatCowBASIC-UNIX-v0_98_06.rar )
save it to Downloads, too.
It is time to extract the Package. Because we are already in the Terminal, let's do it as Command Line Command, too.
Enter
cd ..
unrar x GreatCowBASIC-UNIX-v0_98_06.rar
This will be the output:
UNRAR 5.50 freeware Copyright (c) 1993-2017 Alexander Roshal Extracting from GreatCowBASIC-UNIX-v0_98_06.rar
Enter password (will not be echoed) for GreatCowBASIC/sources/gcbasic.bas:
Enter GCB as password. (the reason for password is explained elsewhere in the forum)
Now the extract begins, but stop again: Answer the Question "use current password ?" with A
Creating    GreatCowBASIC                                             OK
Creating    GreatCowBASIC/sources                                     OK
Extracting  GreatCowBASIC/sources/gcbasic.bas                         OK
GreatCowBASIC/messages-br.dat - use current password ? [Y]es, [N]o, [A]ll A
The extraction will continue until "All OK" occurs.
Enter
cd ~/Downloads/GreatCowBASIC/sources/linuxbuild
Now enter "ll" and you will see:
bed@bed-VirtualBox:~/Downloads/GreatCowBASIC/sources/linuxbuild$ ll
total 28
drwxr-xr-x 3 bed bed 4096 Jun 12 20:29 ./
drwxr-xr-x 5 bed bed 4096 Aug 15 21:35 ../
-rw-r--r-- 1 bed bed 6486 Apr 27 15:27 install.sh
-rw-r--r-- 1 bed bed 2494 Dec 21  2018 readme-linux-install.txt
-rw-r--r-- 1 bed bed  406 Dec 21  2018 readme.txt
drwxr-xr-x 2 bed bed 4096 Dec 21  2018 supportfiles/
install.sh is not green and the trailing Star is missing, we must make install.sh executable
Small insert to explain why install.sh is not executable:
This comes because rar is unable to archive it, (more or less)
Enter
chmod +x install.sh
 Now ll show this.
install.sh is now executable.
We now ready for compile Great Cow BASIC
Enter ./install build give this a result:
./install.sh build

Great Cow Basic generic Linux installer, Version 0.6

Extracting release, version information...

Compiling GCBASIC Version v0.98.06, released 12/06/2019

FreeBASIC Compiler - Version 1.06.0 (02-17-2019), built for linux-x86_64 (64bit)
Copyright (C) 2004-2019 The FreeBASIC development team.
target:       linux-x86_64, x86-64, 64bit
compiling:    gcbasic.bas -o gcbasic.c (main module)
compiling C:  gcc -m64 -march=native -S -nostdlib -nostdinc -Wall -Wno-unused-label -Wno-unused-function -Wno-unused-variable -Wno-unused-but-set-variable -Wno-main -Werror-implicit-function-declaration -O0 -fno-strict-aliasing -frounding-math -fno-math-errno -fwrapv -fno-exceptions -fno-unwind-tables -fno-asynchronous-unwind-tables -masm=intel "gcbasic.c" -o "gcbasic.asm"
assembling:   as --64 --strip-local-absolute "gcbasic.asm" -o "gcbasic.o"
linking:      ld -m elf_x86_64 -o "gcbasic" -dynamic-linker /lib64/ld-linux-x86-64.so.2 "/usr/local/bin/../lib/freebasic/linux-x86_64/fbextra.x" -s -L "/usr/local/bin/../lib/freebasic/linux-x86_64" -L "." -L "/usr/lib/gcc/x86_64-linux-gnu/7" "/usr/lib/gcc/x86_64-linux-gnu/7/../../../x86_64-linux-gnu/crt1.o" "/usr/lib/gcc/x86_64-linux-gnu/7/../../../x86_64-linux-gnu/crti.o" "/usr/lib/gcc/x86_64-linux-gnu/7/crtbegin.o" "/usr/local/bin/../lib/freebasic/linux-x86_64/fbrt0.o" "gcbasic.o" "-(" -lfb -ltinfo -lm -ldl -lpthread -lgcc -lgcc_eh -lc "-)" "/usr/lib/gcc/x86_64-linux-gnu/7/crtend.o" "/usr/lib/gcc/x86_64-linux-gnu/7/../../../x86_64-linux-gnu/crtn.o"

Compiled successfully.
The GCB Compiler is now ready .
But we have to copy all the Files to a common place also known as Installation.
Enter sudo ./install.sh installThis will end up with this Message:
*** Installed successfully to /opt/GCBASIC !

Check there for some helper shell scripts (*.sh). You can check the GCBASIC version number and release date with, 'gcbasic /version'.

Your PATH should be automatically updated the next time you login.

To use 'gcbasic' before your next login (ie. now), you'll need to ensure that '/opt/GCBASIC' is in your normal user (not root) path. Check if it's there with, 'echo $PATH'. If it's not there, add it with, 'PATH=$PATH:/opt/GCBASIC'.

To view the local HTML help files, point your web browser to /opt/GCBASIC/Help/index.html

We hope you enjoy using GCBASIC. Please let us know if you need any help:
http://sourceforge.net/p/gcbasic/discussion/
Chapter 2: Installing mplabx
Sadly the needed IPE command is not distributed by Microchip separately, so we must download a 850Mbyte Package
To Download use this URL: https://www.microchip.com/mplabx-ide-linux-installer
Save the MPLABX-v5.25-linux-installer.tar to Downloads.
once again enter the terminal.
Enter
cd ~/Downloads; tar xvf MPLABX-v5.25-linux-installer.tar
This will extract a shell script : MPLABX-v5.25-linux-installer.sh
it is green and marked with the well known star. so this is executable
But before we can start: we have a 64Bit System and the MPLABX Code is 32Bit, so we need an extra step
Enter
sudo apt install libc6:i386 libx11-6:i386 libxext6:i386 libstdc++6:i386 libexpat1:i386
This should work without any trouble so next step is to execute the installer:
Enter
sudo ./MPLABX-v5.25-linux-installer.sh
 The graphical Installer will appear, Click through until the package selection dialog appears.
Here you can uncheck unwanted Packages. Check MPLAB IPE an 8 bit MCUs at least

Read the advice at the End
We will remember it for the end of this Guide.
Chapter 3: Installing and configuring Geany to work convience with Great Cow BASIC
We will go step for step. Because the Author is a command line junkie we will do most thing in console, don't be afraid, only a few minutes left.
Install Geany, the suggested IDE
sudo apt install geany
 Now, start geany a first time. (to start press the META KEY as described obove and begin to type geany, the application will appear. Click it.
Open Tools->Configuration Files->filetype_extensions.conf.
Navigate to Line 33 FreeBasic and extend the line by ;*.gcb
and save it.
This way the Editor set up the correct Syntax Highlighting.
Yes, this is a dirty Hack, but it works so far until someone come up with a cleaner solution The syntax of Freebasic is practically identical to that of Great Cow BASIC, only the special commands like #chip are not highlighted, but we can get over that.
Setting up the tools for compile and flash.
First we need to find out where the Java tool IPECMD is:
In Console enter find /opt -name ipecmd.jar
find /opt -name ipecmd.jar
It will give this:
/opt/microchip/mplabx/v5.25/mplab_platform/mplab_ipe/ipecmd.jar as result.
To be honest, we provide a script which already has the result already in it, but this Description wants to be version-independent. Just to be future save.
But the next step is important and you must do this.
Enter the following lines (use copy paste)
sudo touch /usr/local/bin/gcb-flash.sh
sudo chown $(ll .config/geany/filetype_extensions.conf|cut -d' ' -f 3) /usr/local/bin/gcb-flash.s
This will generate an empty file which is editable as normal User, namly you.
The Editor Geany is still running, yes? Please create a new file with the left most icon [+].
Copy paste the following lines in it
# gcb-flash.sh
# by darkdau 21.Aug.2019
# to set the correct Path to ipecmd.jar execute the following line:
# find /opt -name ipecmd.jar
# this will print out one or more lines, choose the one you want use
# and edit the next line
IPECMD="/opt/microchip/mplabx/v5.25/mplab_platform/mplab_ipe/ipecmd.jar"

# simple test for Typo
if [ -e "$IPECMD" ]
then
        # finding the filename
        BASENAME="$(basename $1)"
        GCBNAME="$(echo $BASENAME|cut -f1 -d.)"
        #echo "Basic Source=$GCBNAME.gcb"
        BASICFILE="$(dirname $1)/$GCBNAME.gcb"
        CHIPLINE="$(grep -i '#chip ' $BASICFILE)"
        TARGET="$(echo $CHIPLINE|sed 's/#chip//I' |sed 's/ \+//g'|cut -d, -f1)"
        echo "Flashing Target:$TARGET"
        echo "using java -jar $IPECMD -TPPK3 -P$TARGET -M -F\"$1\""
        java -jar $IPECMD -TPPK3 -P$TARGET -M -W -F"$1"
       #java -jar $IPECMD -TPPK3 -P$TARGET -M -W -OL -F"$1"
else
        echo "$IPECMD was not found"
fi
Highlighting will appear after the save, so don't worry.
This Script is responsible for flashing PIC it will not release the PIC from Reset after Flashing.
That's why we now copy the file to an alternate name.
Enter
sudo cp /usr/local/bin/gcb-flash.sh /usr/local/bin/gcb-flash-release.sh

sudo chown $(ll .config/geany/filetype_extensions.conf|cut -d' ' -f 3) /usr/local/bin/gcb-flash-release.sh

ll /usr/local/bin/gcb*
The output of ll should look like:
ll /usr/local/bin/gcb*
-rwxr-xr-x 1 bed root 894 Aug 21 14:05 /usr/local/bin/gcb-flash-release.sh*
-rwxr-xr-x 1 bed root 894 Aug 21 13:04 /usr/local/bin/gcb-flash.sh*
edit the file gcb-flash-release.sh
 Activate the line with the IPECMD where the option OL is contained by deleting the #.
Important: the other line where this option is not must be commented out, so insert the # here.
Here is a screenshot to make it clearer.
For all Command line switches of $IPECMD see file:///opt/microchip/mplabx/v5.25/docs/Readme%20for%20IPECMD.htm
To be able to directly compile and flash with F8 and F9, the following entries are necessary.

Navigate in Geany to Build->Set Build Commands.
Please note that any * .gcb file is loaded and the tab is also active, because Geany has different tools for each file type. You may use any File out of /opt/GCBASIC/demos/
for 1,2,3 enter
1. /opt/GCBASIC/makehex.sh %d/%f
2. /usr/local/bin/gcb-flash.sh %d/%e.hex
3. /usr/local/bin/gcb-flash-release.sh %d/%e.hex
2 and 3 are still in an experimental stage, but seems to work reasonably well. Of course, we will investigate reported errors as soon as possible.
Now save the settings. You are now ready to compile and flash PIC Microprocessors.
This Article is now ending.
For AVR Microprocessors we will make an extension to it later
Please comment for worries, troubles, suggestions, criticism at https://sourceforge.net/p/gcbasic/discussion/create_topic/579125/